










Business Central: Configuration Packages and XML Mapping for Effective Data Migration
Index 
This is the final chapter of my trilogy on data migration in Business Central. I started with the "How to organize" (the methodology), continued with the "With what" (the migration tool and configuration packages), and I conclude today with the "What": the Excel data medium.
This last installment is undoubtedly the most technical. We will see how XML mapping structures Excel files and how, by manually modifying it, we can exceed standard import limitations. Ready for this final technical deep dive?
The Excel File
The Excel file used for imports involves, for each data table, two distinct elements:
- A dedicated tab hosting the data table itself;
- An integrated XML mapping file, which describes the correspondence between table columns and Business Central table fields.
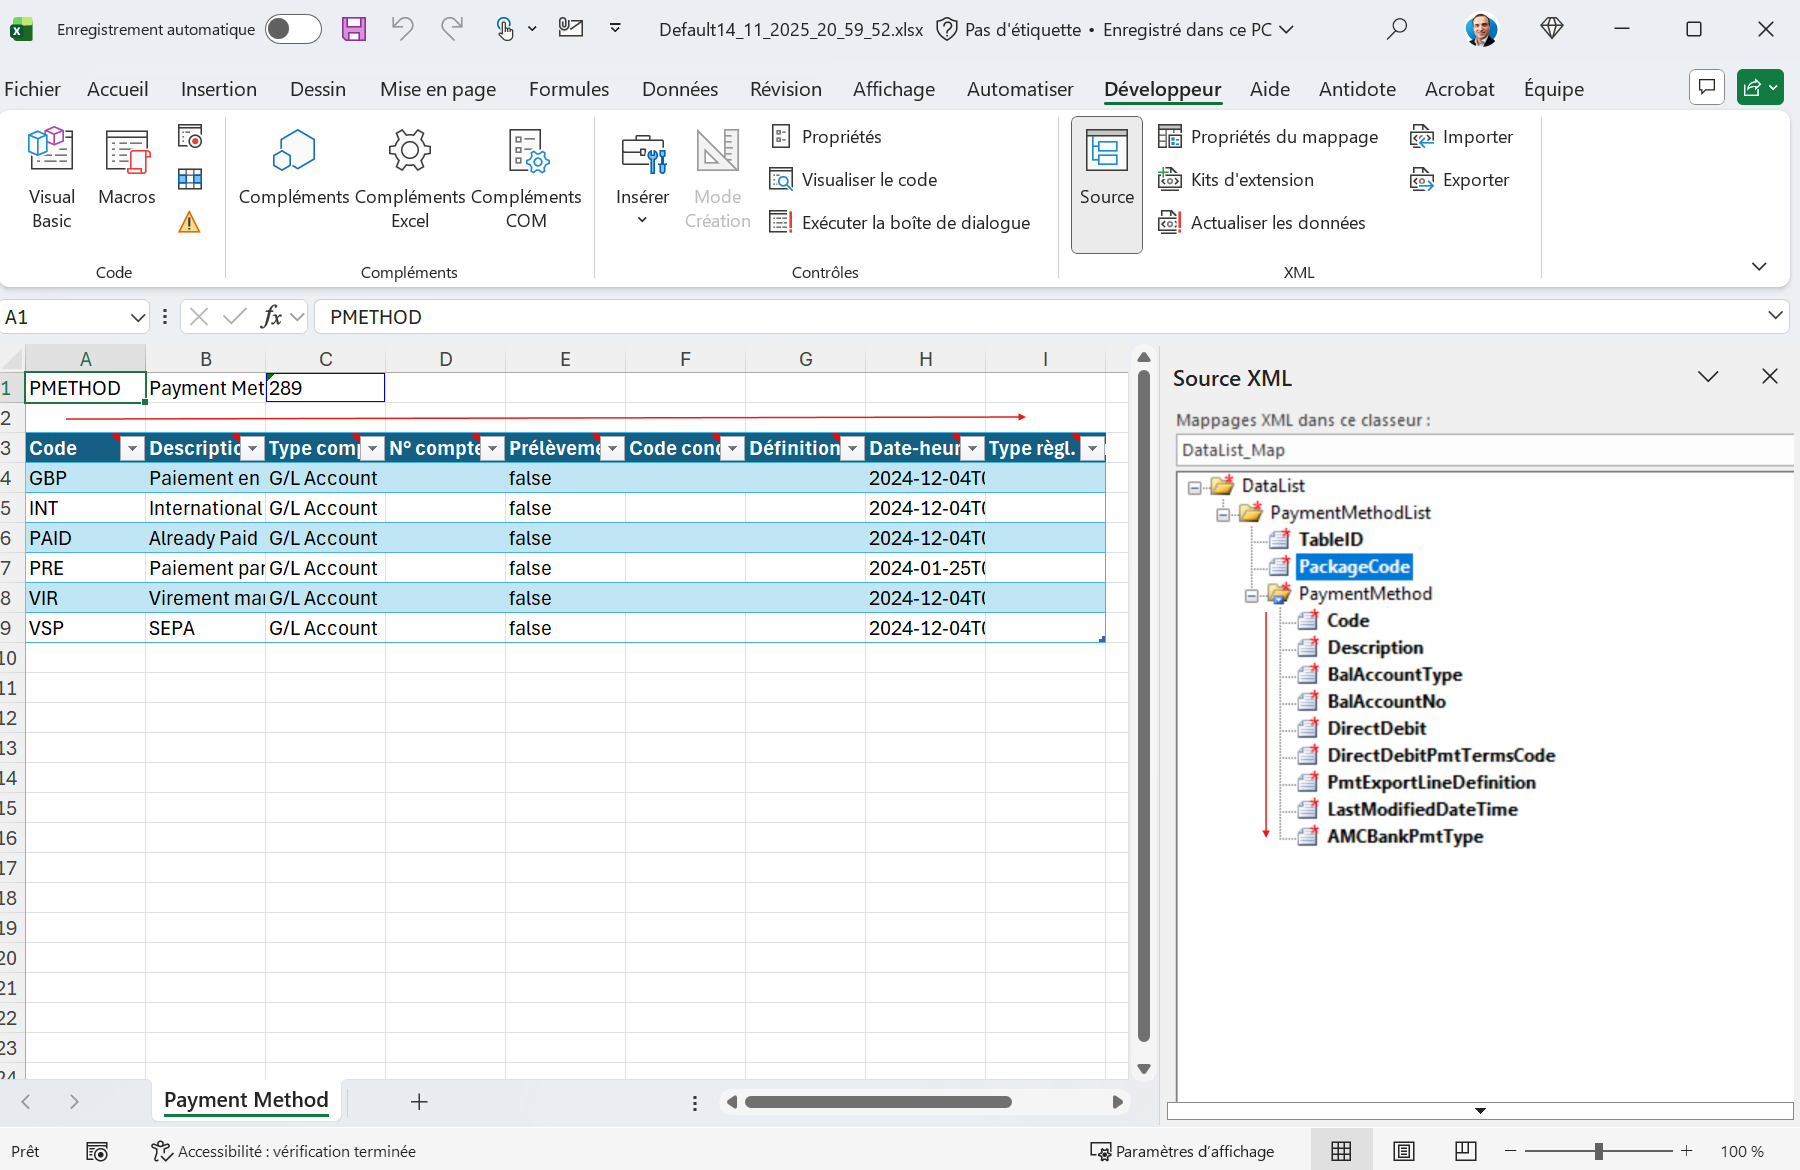
This XML mapping is attached to each sheet and can be consulted directly from Excel: by opening the "Developer" tab, clicking the "Source" button in the XML section, then selecting the schema associated with the current sheet. The mapping structure that will be used during importation is thus visible, and will be used to match each table column to package target fields.
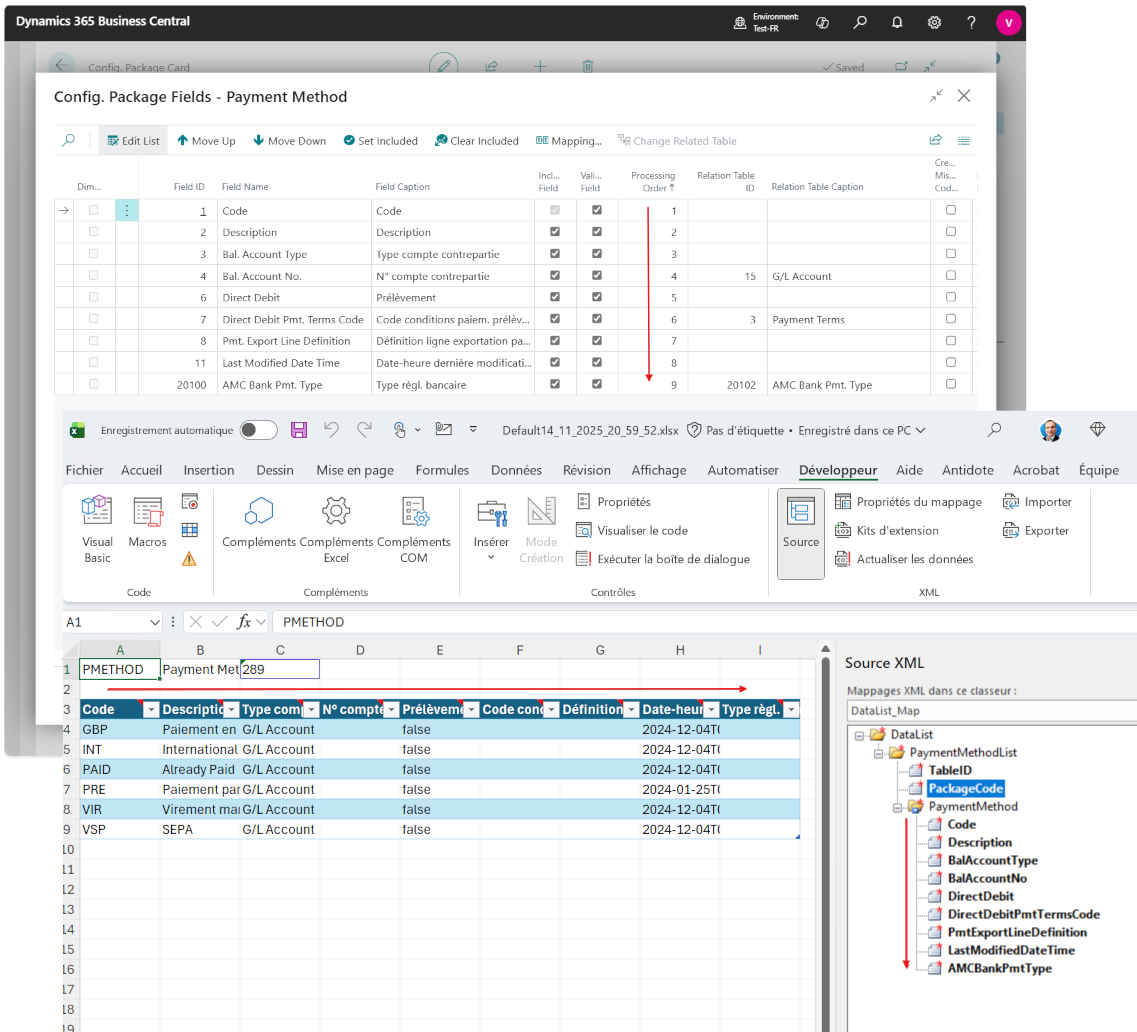
The order of fields defined in the XML mapping (listed from top to bottom) must correspond exactly to the order of data table columns (from left to right) present on each sheet. You can add additional columns in the table; these will remain unmapped as long as they are not referenced in the XML. However, it is imperative to keep the order of already mapped columns, otherwise the import process will associate values with the wrong fields and generate validation errors.
The order of fields as defined in the configuration package constitutes the master reference: it determines both the sequence of tags in the XML mapping and the arrangement of columns in the Excel data table. Thus, each package field appears in the XML in the same order, and table columns must follow this arrangement exactly from left to right to guarantee correct correspondence during importation.
XML Mapping
XML mapping constitutes the heart of the import process: it indicates to Business Central how to identify each Excel table column and what data type (text, integer, date, boolean, etc.) to associate with it. In this paragraph, I will show how to extract, modify, then re-import this mapping in order to adjust the Excel file to package requirements.
It sometimes happens that the file transmitted to the client does not reflect exactly the order of fields as defined in the configuration package. In this case, the most direct solution consists of using the field movement arrows (up or down) available in the package interface: by reordering fields, Business Central automatically regenerates an Excel template whose XML mapping integrates the new order. One can then copy client data into this template without having to manually recreate the table.
However, when a table involves a large number of fields, manual rearrangement can become very time-consuming. It is then often faster and simpler to master the creation and modification of XML mapping: by directly editing the XML file, one aligns the order of XML tags with existing columns, adjusts types if necessary, then re-imports the file. This approach avoids back-and-forth in the package interface and allows quickly preparing a compliant Excel file, even for the most voluminous tables.
Exporting the Mapping
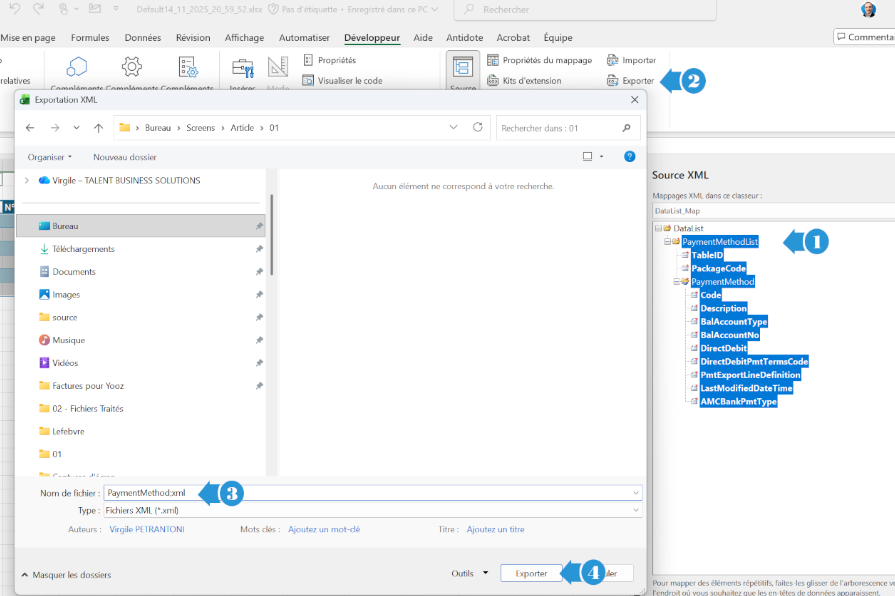
To export the XML mapping, simply select the node corresponding to the table, located immediately after the main node named DataList, and click on "Export" in the Developer tab, XML section.
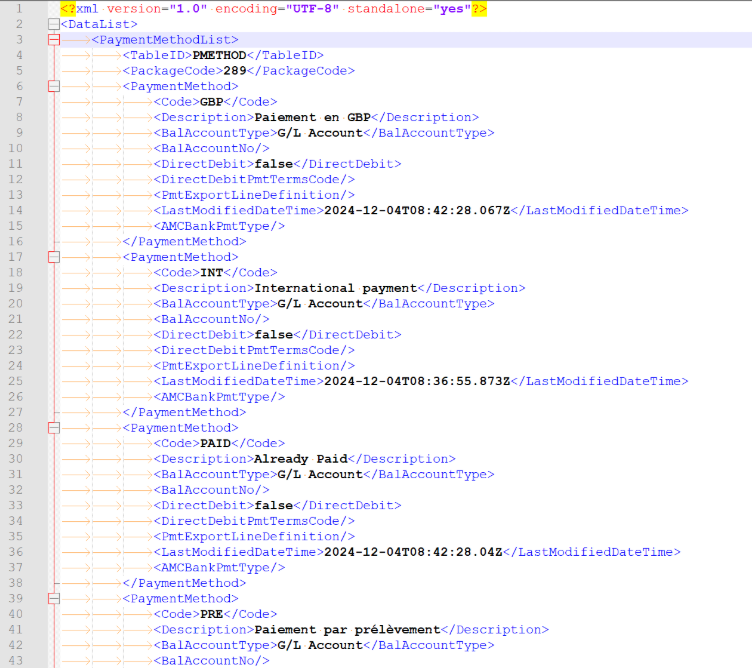
By opening the XML file, one observes that table data are also exported; the file therefore contains not only the mapping but also the actual content of the rows.
To export only the mapping without including data, follow this little trick:
- Delete the link between each mapping field and its column;
- Create a new table by establishing links between the mapping and columns again;
- Fill a single record with any value;
- Launch the mapping export.
Thus, you preserve original data, avoid exporting the entire dataset, and retrieve only the mapping accompanied by a single dummy record.
Removing Links
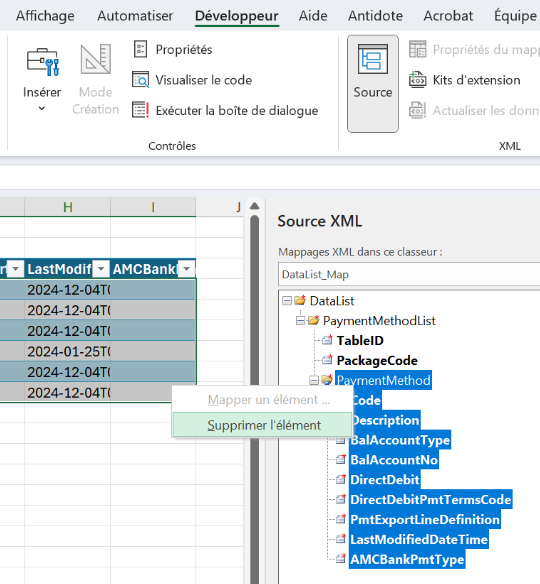
Select the node corresponding to the table, right-click "delete element".
Creating a New Table
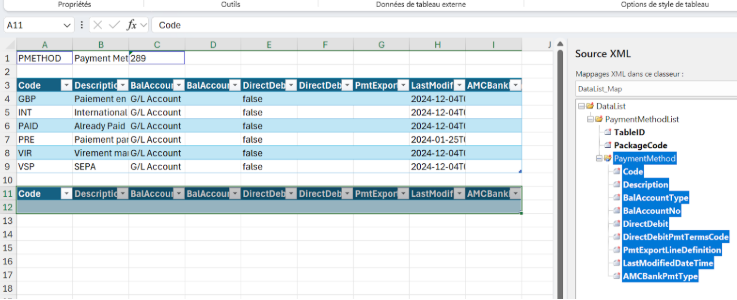
Simply choose the node corresponding to the table, then drop it onto an empty cell of the sheet. This manipulation automatically generates a new, blank table, where each column already possesses its associated mapping.
Inserting a Record
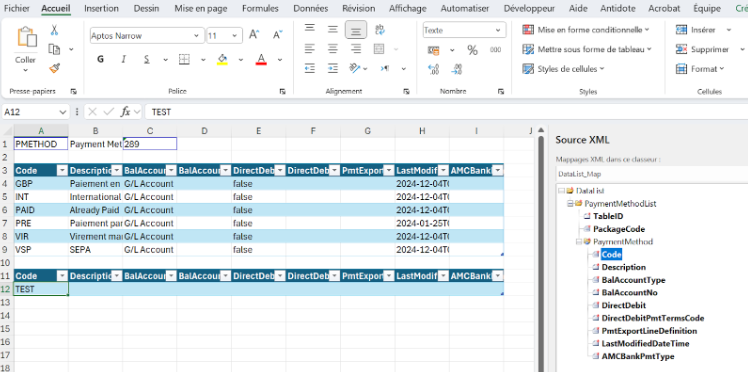
Before exporting the XML file, it is necessary to insert at least one datum.
By applying the three steps described in the "Exporting the Mapping" section, the generated XML file will contain only the mapping accompanied by a single value.
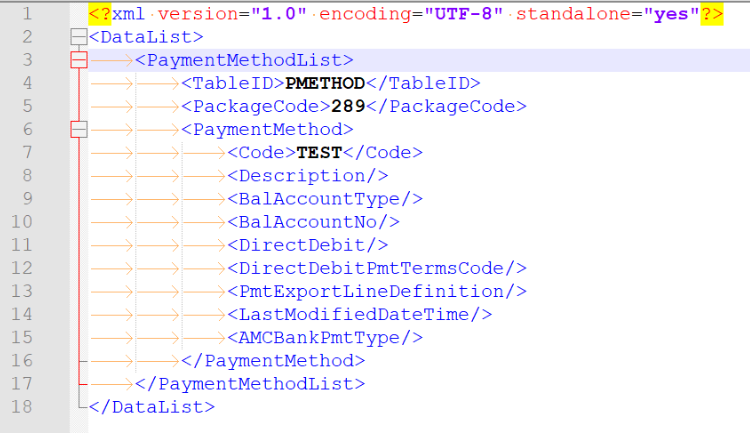
It remains only to eliminate the value "TEST" from the <Code> element, or rather replace it with the xml tag: <Code/>.
Now that we master the export of an XML mapping, we can modify it: add new fields, reorganize column order, then re-import it and attach it to the table containing original data.
There are some rules to know regarding how Business Central generates field names in XML mapping:
- Dots (".") are removed.
- Spaces are withdrawn.
- All special characters (for example "<", ">", "&", etc.) are eliminated.
In practice, a field label is "cleaned" of these characters before being used as an XML identifier. Thus, the field titled:
Bal. Account No.
becomes simply:
BalAccountNo
Importing a New Mapping
In the conclusion of this article, I will re-import into the Excel workbook a mapping whose fields I have reordered.
To grasp the interest of these successive manipulations, one must first understand the context: it is a common case where the client provides us with an Excel file where the order of data table columns differs from that of the XML mapping. Some columns were added without being mapped, others lost their association.
Rather than starting from a template file exported from Business Central – which would then have to be manually adapted to this new arrangement – I show you here how to directly import a new mapping that reflects the order desired by the client. This approach avoids rebuilding the template from zero and guarantees that columns are correctly aligned with the mapping.
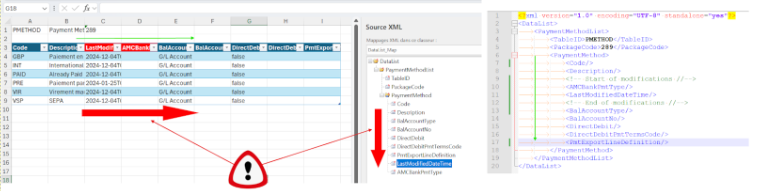
In the image above, we see that the Excel file no longer follows the original mapping order. The new mapping displayed on the right is the one I adjusted to correspond to this new layout, and it is the one I will re-import.
Mapping import is launched via the "XML Mapping" button located at the bottom of the mapping window.
When the small dialog box opens, displaying the list of mappings present in the Excel workbook, you can create a new one by clicking on "Add".
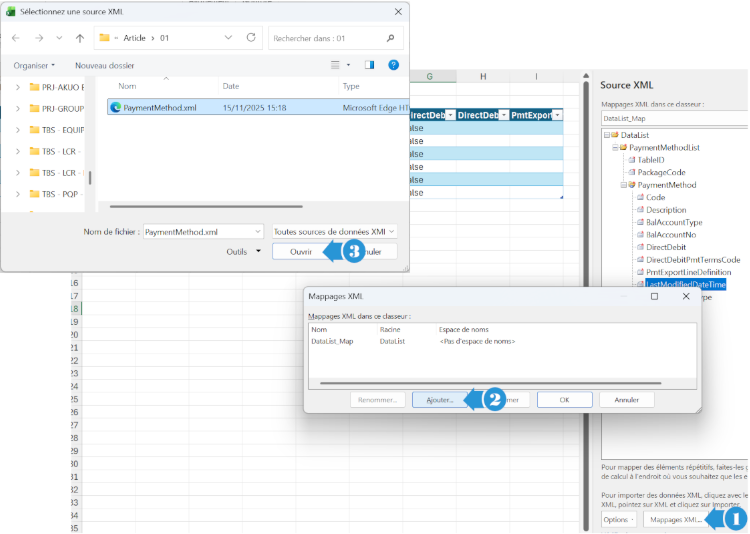
Once the XML file is chosen, Excel automatically inserts a new entry in the mapping list.
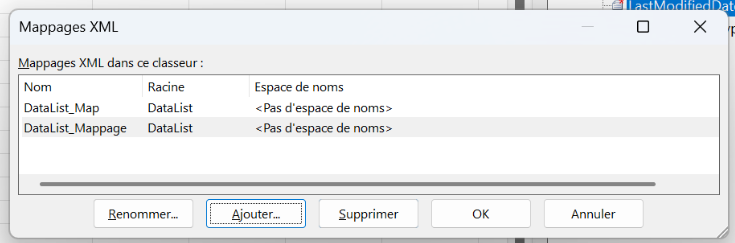
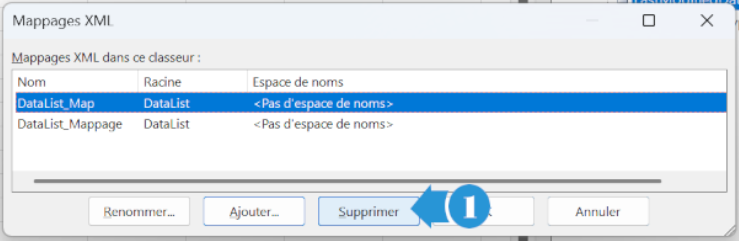
It remains only to delete the old mapping.
Close the XML mapping window, then drop the new mapping onto the data table.
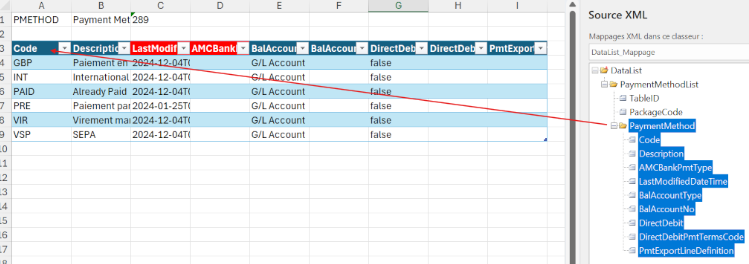
One must not forget to map also the two fields TableID and PackageCode on the header, by drag and dropping them onto the two concerned cells.
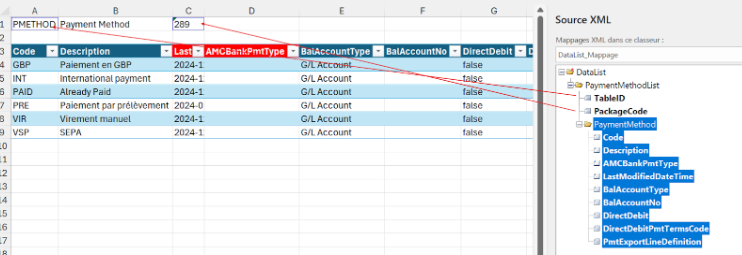
If, by placing the TableID field back on the concerned cell, Excel automatically creates a header row, it must be deleted. For this, open table creation options, deactivate "Header Row" (choose "No") in the Style Options section, then validate.

The manipulations are finished: the Excel workbook now features a data table whose mapping is perfectly aligned with column order. This file can be imported into a configuration package, even if the package uses a different field order.
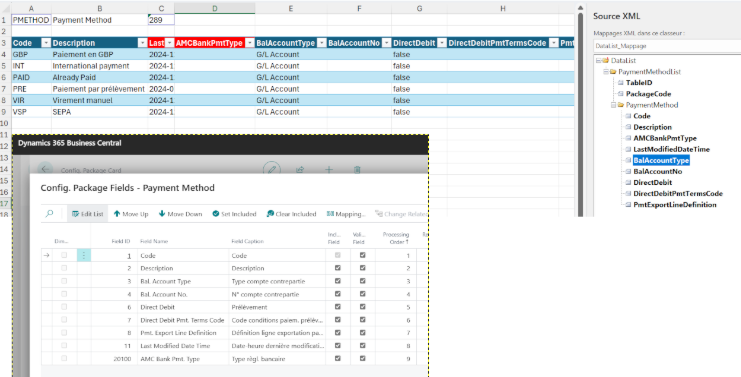
In the presented example, data import from the Excel file to the chosen package will proceed correctly, since Business Central will recognize the columns.
With this three-part series, you now have a complete overview—from methodology to XML mapping—to secure your Business Central migrations. Now it's your turn to act, but also to share: let's connect on LinkedIn to keep the discussion going. Whether it's to correct me, suggest new topics, or simply let me know if this content helped, your messages and encouragement will be the driving force behind my future articles.






No comments yet.